Getting Started
React, also known as React.JS or ReactJS, is a Javascript library and development framework primarily for building user interfaces. Typically React applications and libraries are developed and managed using the NPM package management tool and various other tools that are themselves installed and managed using NPM. NPM is installed and distributed together with the Node.js Javascript runtime environment. To be able to use these tools and therefore to properly follow this material, you must first install the latest NPM and Node.JS:
Once installed, you should be ready to move forward.
Setup
Now it's time to create our sample application. Create a new directory for you React app. Then inside that directory, copy the project structure as illustrated below:
sampleapp/
	public/
		index.html
	src/
		index.js
	package.json
Now let's put some content in your index.html file.
<!DOCTYPE html>
<html>
	<head>
		<title>React Sample App</title>
	</head>
	<body>
		<div id="root"></div>
	</body>
</html>
Then place the following code in your index.js.
import React from 'react';
import ReactDOM from 'react-dom';

class MyComponentClass extends React.Component {
	render() {
		return( <h1>Hello World!</h1> );
	}
}

ReactDOM.render(<MyComponentClass />, document.getElementById('root'));
In the example above we’re telling React to take our MyComponentClass component and render it to the element with an ID of root.
What is a component?
The user interface development in ReactJS is all about components, which are the fundamental building blocks of every React application. A component is a small, reusable chunk of code that is responsible for one job. That job is often to render some HTML. Consider the following screenshot:
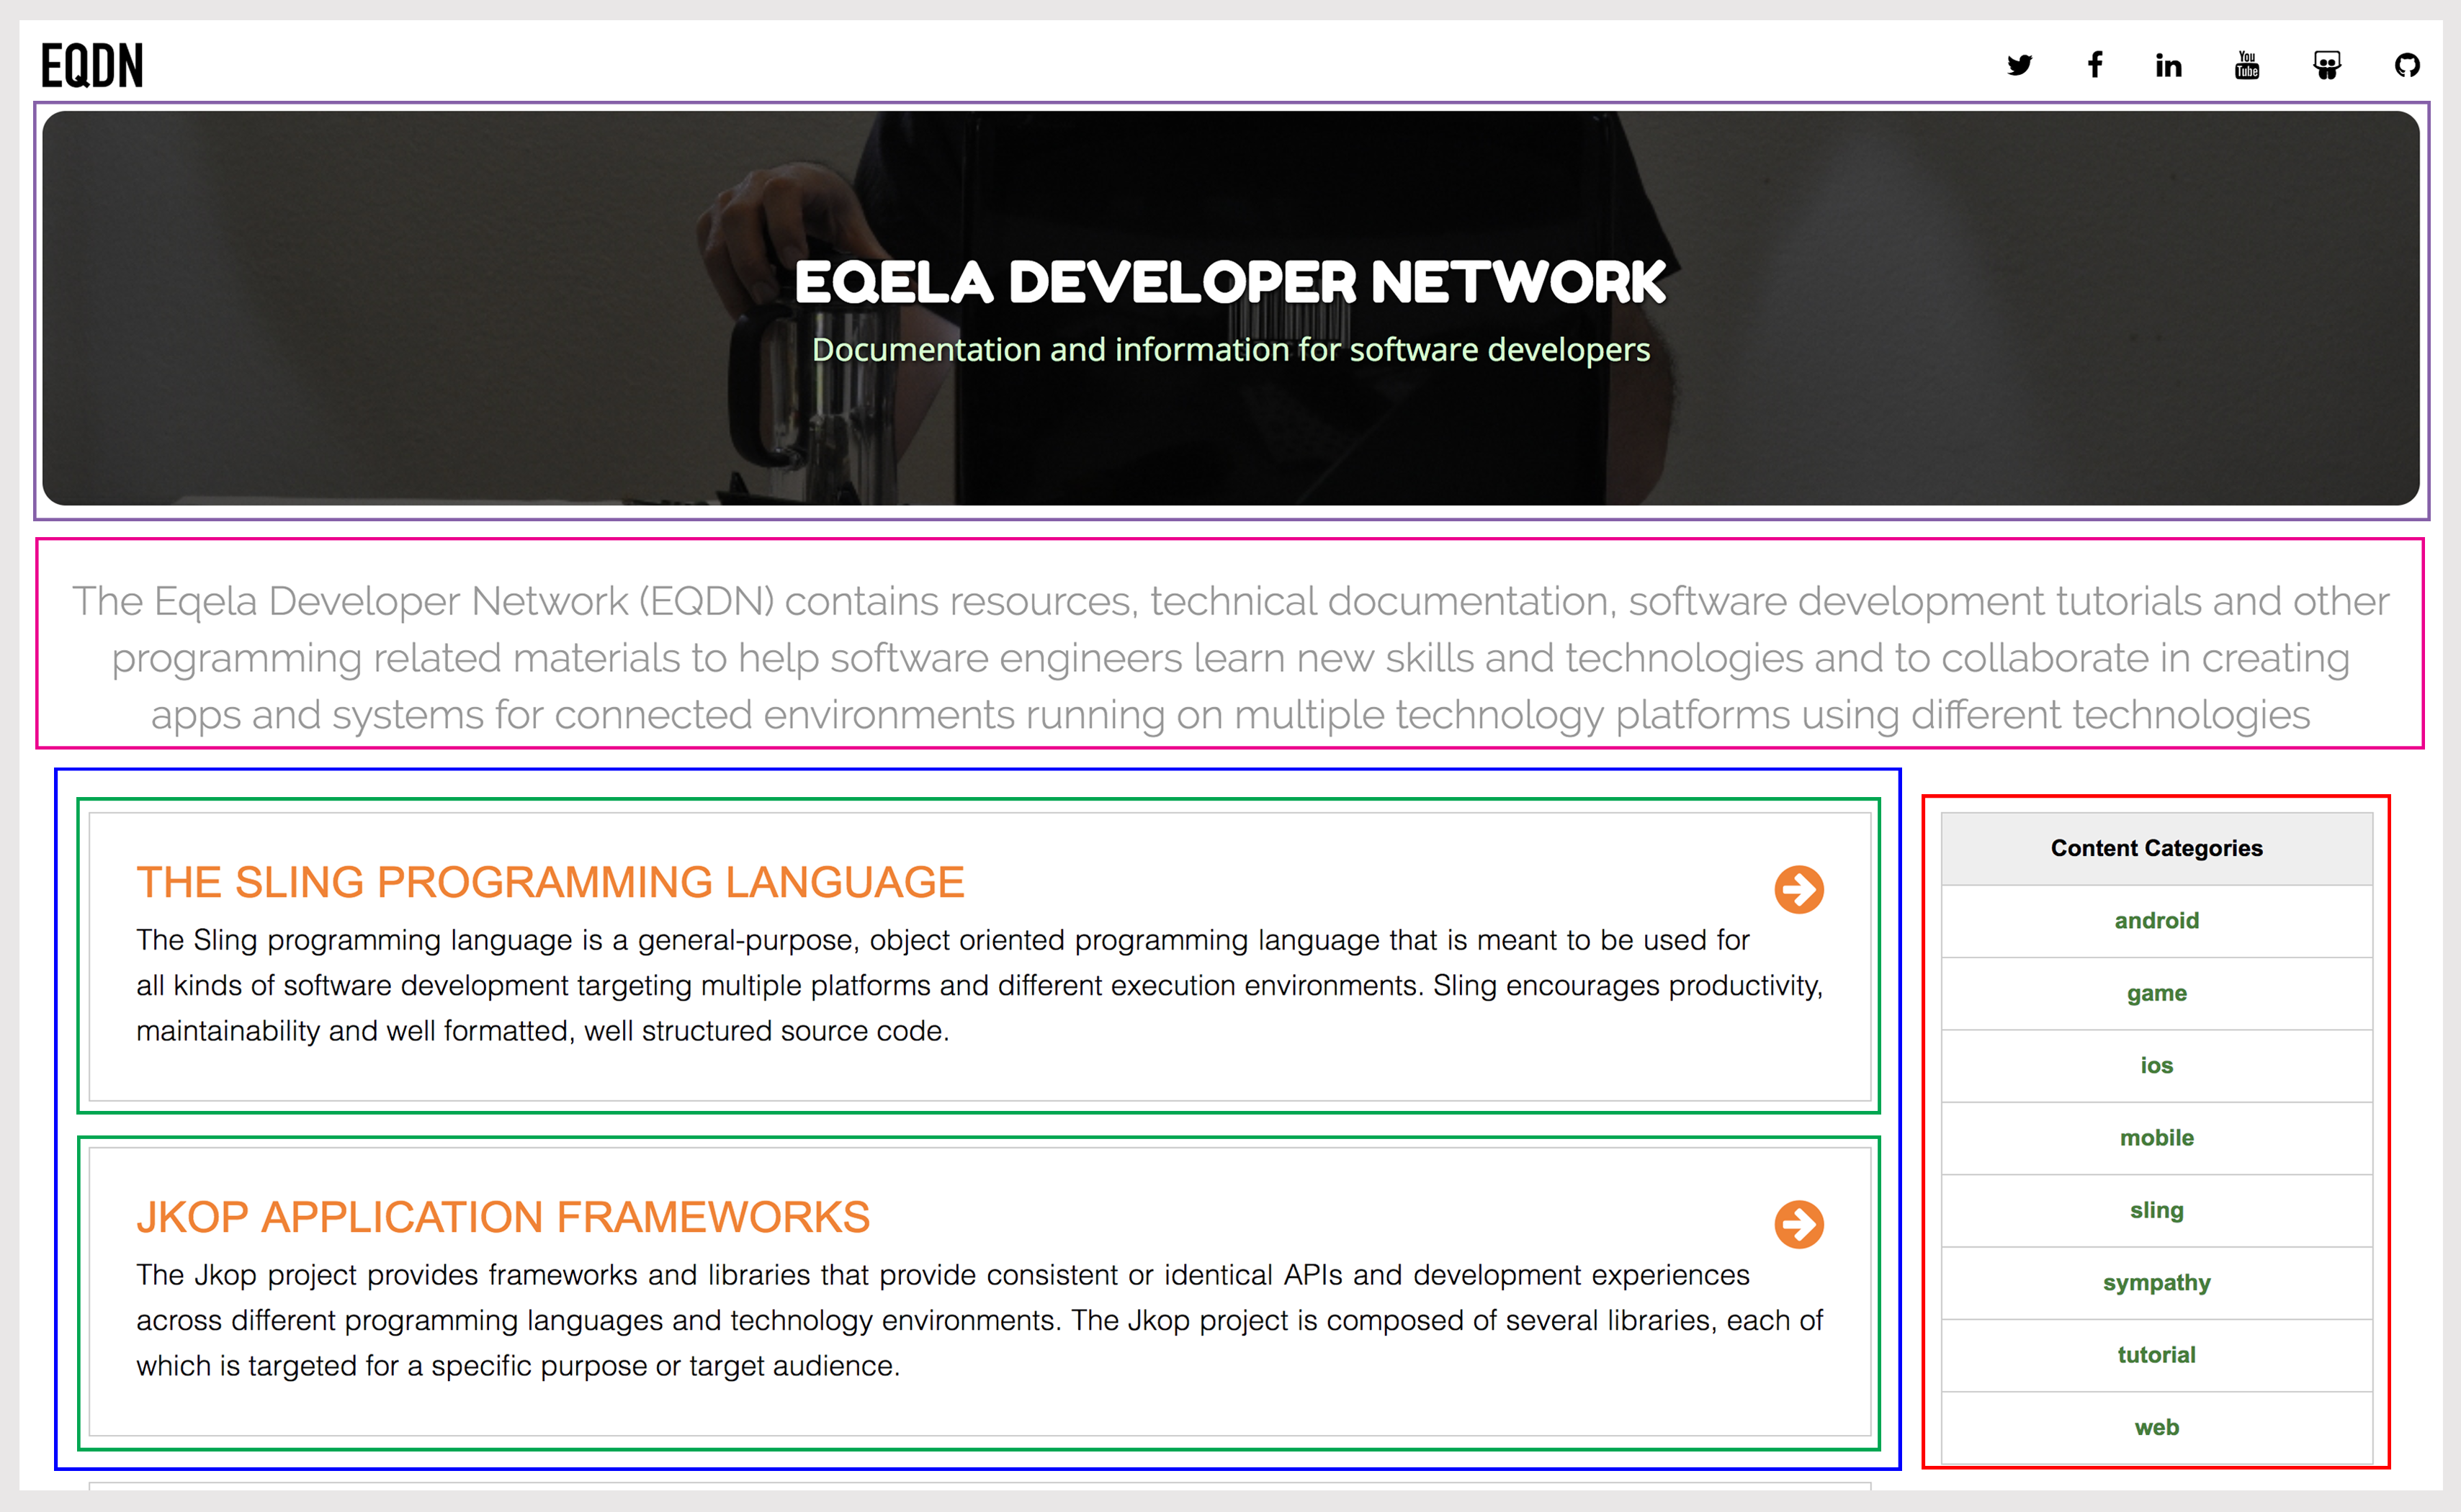
Above we can see the homepage of EQDN. If we would develop this page using React, it could be composed of different components as highlighted by the different-colored rectangles in the screenshot. Each rectangle could be implemented by one component. Each component can also have nested components.
In our MyComponentClass component, we imported the primary libraries that we need to use. Aside from the 'react' library, we also included 'react-dom'. The 'react-dom' library contains several React-specific methods, all of which deal with the DOM in some way or another. Component class names must begin with capital letters. This adheres to JavaScript's class syntax and to a broader programming convention in which class names are written in Camel Case. Thus, as a sample the component class is named as 'MyComponentClass'. We used the base class React.Component to define a React Component class. The React.Component is followed by a pair of curly braces that encloses the body of the Component class. The body of the Component class will act as set of instructions on how the Component class should build the React component. The render is the only one property that you have to include inside the body of the Component class. A render method is a property whose name is render, and whose value is a function. A render method must contain a 'return statement'. Usually this return statement returns a 'JSX expression'. According to React docs, "JSX is a syntax extension to JavaScript. It is similar to a template language, but it has full power of JavaScript." The JSX expression will be translated into HTML and rendered on the DOM. JSX elements can be either HTML-like, or component instances. JSX uses capitalization to distinguish the two elements, that is the React-specific reason why component class names must begin with capital letters. In a JSX element, that capitalized first letter indicates that it will be a component instance and not an HTML tag. In our example, we used the render method. The render method describes what the UI will look like for a particular component.
To get our component to render on the screen we have used ReactDOM.render() like this:
ReactDOM.render(<MyComponentClass />, document.getElementById('root'));
The 2 arguments supplied is the React element (component) and the DOM node (container). ReactDOM.render() renders a react component to a DOM node. In the sample above, the render method of the MyComponentClass will be invoked, the resulting JSX element will be rendered into the supplied DOM node container.
Component Lifecycle
Each component you make will have its own lifecycle events. The following lifecycle methods are commonly used:
componentWillMount — Fired once, on both client & server before rendering occurs
componentDidMount — Fired after the component mounted
componentWillUnmount — Fired before the component will unmount
A sample component that implements these could be something like this (do not include this sample in your program):
class SampleComponentClass extends React.Component {
	componentWillMount() {
		// Invoked once before rendering occurs.
	}
	componentDidMount() {
		// Invoked once the component is mounted to the DOM
	}
	componentWillUnmount() {
		// Called IMMEDIATELY before a component is unmounted
	}
	render() {
		return <h1>Hello world</h1>;
	}
}
Then let's add dependencies in our package.json by importing react, react-dom, and react-scripts. This is all we need for us to develop our sample app. Modify our package.json and place the following:
{
	"name": "sampleapp",
	"version": "0.1.0",
	"main": "index.js",
	"dependencies": {
		"react": "16.2.0",
		"react-dom": "16.2.0",
		"react-scripts": "1.1.0"
	},
	"scripts": {
		"start": "react-scripts start",
		"build": "react-scripts build",
		"test": "react-scripts test --env=jsdom",
		"eject": "react-scripts eject"
	}
}
Now we can install these dependencies by running the command npm install where our package.json is located. After all dependencies have been installed, we could run the app by executing this command:
npm start
It will run the app in development mode and it will open the page (http://localhost:3000) in the browser. The page will automatically reload if you make changes to the code. You should see 'Hello World!' now on your page.
Using Props and State
props is short for 'properties'. They are used to pass parameters from parents to children. It is something that carries same data throughout its life cycle. Props are read-only.
defaultProps - allows you to set default props for your component
PropTypes - used to catch a lot of bug by typechecking props
Now, let's modify our MyComponentClass component so that instead of displaying 'Hello World', it will display the value of our choice. Inside the render method, change the following line:
return( <h1>Hello World!</h1> );
to
return( <h1>Hello {this.props.name}</h1> );
With this changes, it will now display the value of the property name. But how do we pass the value to a property? You can pass data in React by defining custom HTML attributes to which you assign your data with JSX syntax. Modify the line of code on which MyComponentClass is called and passed a value to our property name as shown below:
<MyComponentClass name="Renzy" />
The sample app now should display 'Hello Renzy'.
The state is internal data (store) object of a component. It can change during a lifecycle of a component.
A stateless component is just a function that returns HTML. Below is an example.
class MyComponentClass extends React.Component {
	render() {
		return <h1>Hello Renzy</h1>;
	}
}
A stateful component is a class that manages state.
class MyComponentClass extends React.Component {
	constructor(props) {
		super(props);
		this.state = { name : "Renzy" };
	}
	render() {
		return <h1>Hello { this.state.name }</h1>;
	}
}
In the example above, we are adding a local state to a class. First, we added a constructor and then set the initial state. Then in the render method, we access the state by calling this.state.name .
Let's modify now our MyComponentClass component so we can have a button, that when clicked, will either show or hide the greeting \ depending on the value of our state.
render() {
	return(
		<h1>Hello { this.props.name }</h1>
		<button>Toggle</button>
	);
}
But with our code above, we will encounter an error Syntax error: Adjacent JSX elements must be wrapped in an enclosing tag. This is because we are returning two elements simultaneously. We need it to wrapped to a parent element as shown below:
render() {
	return(
		<div>
			<h1>Hello { this.props.name }</h1>
			<button>Toggle</button>
		</div>
	);
}
We need to add now an event handler to our button, so when it is clicked, we will call a method called toggle. First, create a method called toggle inside our MyComponentClass component.
toggle() {
}
Then add a constructor in our MyComponentClass component and bind this to the method toggle. Our MyComponentClass component should like this by now.
class MyComponentClass extends React.Component {
	constructor(props) {
		super(props);
		// This binding is necessary to make `this` work in our toggle method
		this.toggle = this.toggle.bind(this);
	}

	toggle() {
	}

	render() {
		return(
			<div>
				<h1>Hello { this.props.name }</h1>
				<button>Toggle</button>
			</div>
		);
	}
}
Now we want to add a click event to our button, react events are named using camelCase, rather than lowercase. Modify our button so we could add an onClick event as shown below:
<button onClick={this.toggle}>Toggle</button>
As you can notice above, we pass a function/method as the event handler, rather than a string. Everytime the toggle method is called, we want to store a value in our state to determine if we want the greeting to be displayed or not. Let's declare a key show in our state with a default value of true. Modify our constructor and add this line:
this.state = { show : true };
Then modify our toggle method so everytime it is called, we will modify the value of show in our state.
toggle() {
	this.setState({ show: !this.state.show });
}
Lastly, we want to modify our render method so we only display the greeting if the value of our state show is true. We could do conditional statements like this:
render() {
	let greeting;
	if (this.state.show) {
		greeting = <h1>Hello { this.props.name }</h1>;
	}
	return(
		<div>
			<div>{greeting}</div>
			<button onClick={this.toggle}>Toggle</button>
		</div>
	);
}
Now you have a greeting in our page that is shown/hidden everytime the user clicks the Toggle button.